Installing fibre in your home can seem daunting, but it’s quite straightforward if you follow a few steps. First, grasp the basics of fibre optics; these cables transmit data using light, affording faster speeds than copper. Next, identify which internet service providers operate in Cape Town: Telkom, Rain, and Vodacom are good places to start. Check their coverage online for your area before signing up for a suitable package based on how much you use the internet. After that’s all done, schedule an installation and prepare your home by ensuring easy access points. The technician will handle everything from digging trenches if needed to testing the connection once they’re finished. Finally, set up your router as per their instructions and take note of any local regulations regarding installations.
Understanding Fibre Optic Basics
Fibre optic cables are at the forefront of modern communication technology, using light to transmit data instead of the electrical signals used in traditional copper cables. This method allows for significantly faster internet speeds and greater bandwidth, making fibre an ideal choice for households that require reliable and high-speed connections for activities such as streaming, online gaming, and working from home. Unlike copper, fibre optics are less susceptible to interference and signal degradation, resulting in a more stable internet connection. In Cape Town, the growing demand for fibre has led to an expansion of networks, making it essential for homeowners to understand the basics of this technology to make informed decisions about their internet connectivity.
Determine Your Provider in Cape Town
In Cape Town, there are several internet service providers (ISPs) you can choose from for fibre installation. Major players in the market include:
1. LunaFibre – Known for its reliable fiber internet services and excellent customer support, LunaFibre is a growing ISP in the local market.
2. Octotel – Focused on providing high-speed fiber connectivity, Octotel is a competitive option for those seeking robust internet solutions in their area.
3. Afrihost – A popular choice for both ADSL and fiber, Afrihost offers flexible packages and strong customer service.
4. Cool Ideas – Renowned for its no-frills, straightforward approach to internet services, Cool Ideas provides great quality and competitive pricing.
5. Frogfoot Networks – An emerging player in the fiber network space, Frogfoot offers good coverage and reliable speeds for various needs.
It’s important to research their offerings, as each provider has different packages and coverage areas. You can easily find this information on their websites. Additionally, ensure that fibre is available in your specific neighbourhood, as some areas may have limited or no fibre coverage at all. Once you’ve identified which providers service your area, you can compare their internet packages based on your specific needs, whether that’s for streaming, gaming, or general browsing. This step is crucial to ensure you select a plan that best fits your usage.
Check Fibre Availability in Your Area
Before you can enjoy the benefits of fibre optic internet, it’s crucial to check whether it’s available in your area. Start by visiting the websites of various internet service providers (ISPs). They usually have a dedicated section where you can enter your address or postcode to see if fibre is offered in your neighbourhood. Keep in mind that while some areas in Cape Town may have extensive coverage, others might only have limited options or no availability at all. It’s advisable to check this information thoroughly, as fibre installation can vary significantly from one street to another. For instance, you might find that your neighbour has fibre installed, but your house is not within the serviceable area. If fibre is indeed available, you can then move ahead with selecting a suitable package tailored to your internet needs.
Sign Up for a Fibre Package
After identifying a suitable provider that services your area, it’s time to sign up for a fibre package that meets your needs. Consider your internet usage habits: if you enjoy streaming high-definition movies or gaming online, you may want a package with higher speeds and bandwidth. On the other hand, if your usage is more casual, such as browsing and emailing, a lower-tier package may suffice. Providers often offer a range of plans, so take your time to compare them. Once you’ve made your choice, visit the provider’s website or contact their customer service to complete your sign-up. Be prepared to provide some personal information and possibly proof of residence. Additionally, look out for any promotions that might give you the first month free or discounted installation fees. Signing up is typically straightforward, but ensure you read the terms and conditions, especially regarding contract length and cancellation policies.
Schedule Your Installation Date
Once you’ve signed up for your fibre package, it’s time to schedule your installation date. Your internet service provider will typically reach out to you to arrange a suitable time. It’s important to ensure that you are available at this time, as the technician may need to discuss specific installation details with you or obtain necessary permissions for accessing your property. Make sure to clear your schedule and be prepared for any potential delays, as weather conditions or other unforeseen circumstances can sometimes affect the installation process. For example, if you’re in a coastal area, strong winds or rain could postpone the work. Having a flexible mindset will help make the installation process smoother.
Prepare for the Installation Process
Before the installation of fibre in your home, it’s essential to ensure that the site is properly prepared. First, identify where the fibre line will enter your property; this is typically through an external wall or an underground conduit. Clear any obstacles or debris from this area to allow easy access for the technician. It’s also wise to discuss specific installation requirements with your internet service provider (ISP). For example, if you prefer the cable to be routed through walls or ceilings instead of being visible, communicate this in advance. Additionally, consider any local regulations or guidelines from homeowner associations that may affect the installation process. Being proactive in these areas will help facilitate a smoother installation experience.
Clear the area where the installation will take place.
Ensure that there is easy access to power sources.
Remove any obstacles that might hinder the technician’s work.
Confirm the installation date and time with your provider.
Prepare a list of questions for the technician.
Discuss any potential concerns with your provider in advance.
Ensure that someone is available at home during the installation.
Installation Process Explained
Credits: dgtlinfra.com
The installation process for fibre in your home begins with a technician visiting your property on the scheduled date. They will first assess the best way to bring the fibre optic cable from the street to your home. If your service is underground, this may involve digging a trench. For overhead installations, they’ll need to secure the cable to external walls. Once the cable reaches your home, they will install a fibre termination point (FTP), which is where the fibre cable connects to your internal network.
The technician will then connect the fibre line to the router or modem, ensuring that everything is set up for optimal performance. It’s essential that you communicate any specific routing preferences, such as running the cable through particular walls or ceilings, to the technician. After the physical installation, the technician will test the connection. This is crucial as it verifies that the fibre is functioning correctly and meets the expected speeds. They will also walk you through how to access the router and troubleshoot any potential issues you might encounter.
Once the connection is confirmed, you’ll be guided on how to set up your devices with the router. This includes configuring Wi-Fi settings, such as network name (SSID) and password, to suit your preferences. The entire process is typically completed in a few hours, but it can vary depending on the complexity of the installation and the specific arrangements made with your ISP.
Testing Your Fibre Connection
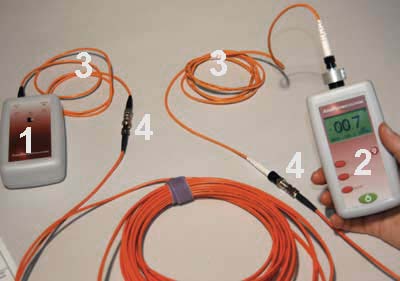
Credits: thefoa.org
After the installation of your fibre optic connection, the technician will perform several tests to ensure everything is functioning as it should. This typically involves checking the signal strength and speed of the connection. They will use specialised equipment to verify that the data transmission is stable and meets the speed promised in your package.
It’s essential to pay attention during this phase, as the technician will provide you with valuable information regarding the connection’s performance. Additionally, they should explain how to access the router and troubleshoot common issues that may arise later. For example, if you experience slower speeds than expected, knowing how to run speed tests or reset the router can be quite beneficial.
Once the initial tests are complete, you should conduct your own tests to reassure yourself everything is working correctly. You can use various online speed test tools to check your internet speed. Remember to test at different times of the day to gauge consistency, as network traffic can affect performance. If any issues are detected, don’t hesitate to reach out to your ISP’s customer support for assistance.
Setting Up Your Router
Credits: mthnetworks.com
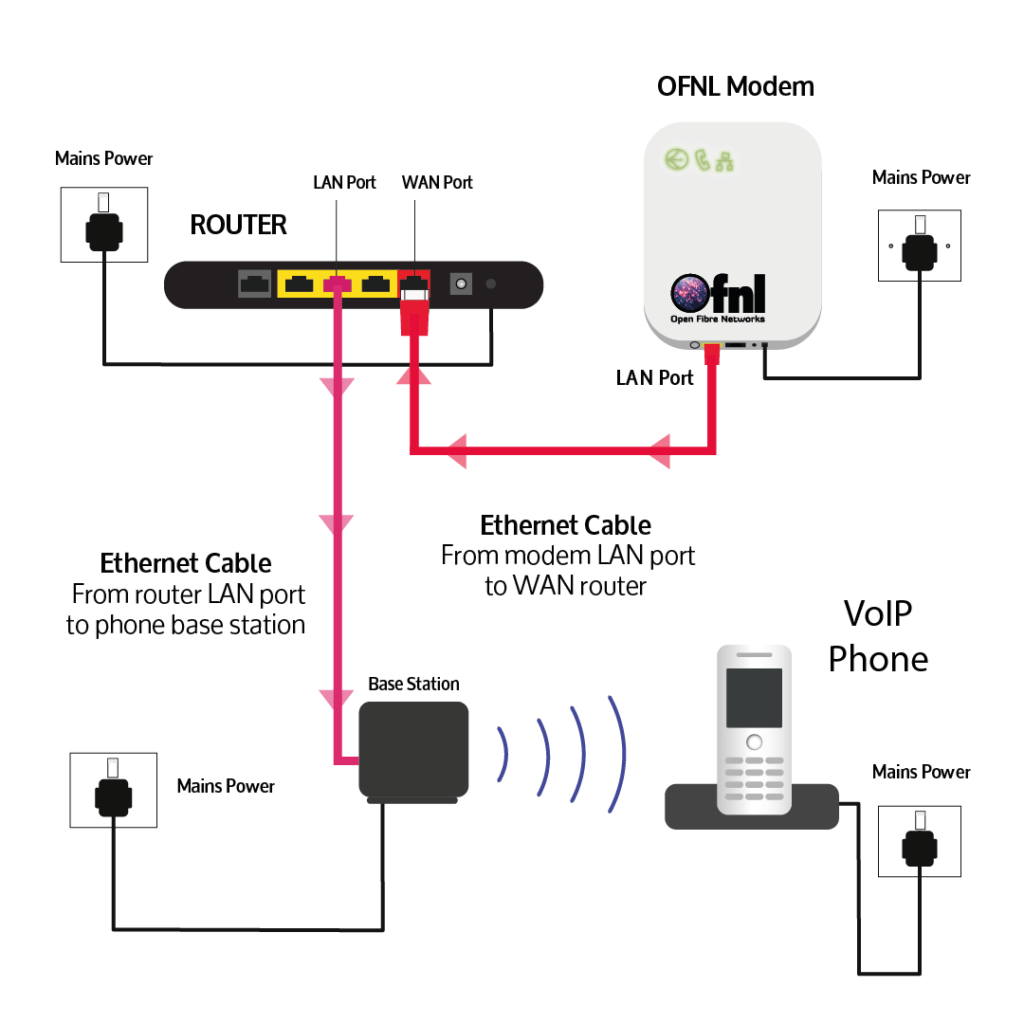
Once your fibre installation is complete, the next step is to set up your router. Begin by locating the router provided by your ISP; this device is essential for distributing the internet connection throughout your home. Connect the fibre optic cable to the router’s WAN (Wide Area Network) port. You may need to consult the router’s manual for the exact port location.
Next, power on the router and wait for the indicator lights to stabilise, which usually takes a few minutes. Once the lights indicate a stable connection, you can proceed to connect your devices. Most routers will have a default Wi-Fi name (SSID) and password printed on the back or bottom of the device. You can connect your smartphone, tablet, or computer to the Wi-Fi network using these credentials.
If you wish to personalise your Wi-Fi settings, log into the router’s web interface by entering the router’s IP address in a web browser. This is typically found in the manual or on the router itself. From there, you can change the network name, password, and other settings to better suit your preferences.
Ensure that you secure your Wi-Fi network by using a strong password to prevent unauthorised access. Additionally, consider enabling features like WPA3 encryption for better security. Once everything is set up, test the connection on various devices to ensure a smooth internet experience. Should you encounter any issues, refer to the troubleshooting section in your ISP’s support resources.
Aftercare and Support Options
Once your fibre installation is complete, it’s important to know how to manage and troubleshoot any potential issues. Most internet service providers in Cape Town offer a range of support resources. Familiarise yourself with these options, which typically include online support portals, live chat, and dedicated help desks. For example, if you experience slow speeds or connectivity issues, your provider’s website may have troubleshooting guides that can help you resolve common problems without needing to call for assistance.
In addition, keep your provider’s contact details handy. They usually have a dedicated customer support line that you can call for more complex issues. Some ISPs even offer a mobile app that provides account management tools and direct access to support. It’s worth noting that response times can vary, so being prepared with details about your problem can help expedite the process.
Also, ensure that you understand any warranty or service agreements that come with your installation. This includes knowing what to do if your fibre connection fails or if you encounter any technical difficulties. Some providers offer extended support plans or maintenance packages for an additional fee, which can be beneficial if you rely heavily on your internet connection for work or entertainment.
Lastly, stay informed about any updates or maintenance work that your ISP may conduct in your area. They often communicate scheduled downtime or upgrades through email or their website, helping you plan for any temporary disruptions.
Local Considerations in Cape Town
When installing fibre in Cape Town, it’s important to be aware of local regulations and guidelines that may affect the installation process. Many neighbourhoods have specific homeowner association rules regarding external installations, such as the placement of equipment and visible cabling. For instance, some areas might require you to seek permission before the installation of external infrastructure.
Additionally, consider the weather conditions typical of the Western Cape, particularly in coastal areas where strong winds and rain can impact the installation schedule. For example, if you live in areas prone to heavy storms, it might be wise to schedule your installation during the drier months when the ground is less likely to be muddy, making it easier for technicians to dig trenches if necessary.
Lastly, engaging with your neighbours can be beneficial, as they may have insights from their own installations that could help you navigate local considerations more smoothly.
Additional Services Offered by ISPs
In addition to standard fibre internet packages, many ISPs in Cape Town offer a range of additional services that can enhance your home connectivity and security. For instance, some providers may include smart home integration solutions that allow you to connect and control devices such as smart thermostats, lights, and security cameras directly through your fibre connection. This can create a more streamlined and efficient home environment.
Furthermore, ISPs might offer security systems that are compatible with fibre installations, providing you with options for monitoring your home via high-definition cameras and alarm systems that benefit from the high speeds and reliability of fibre optics. These services can often be bundled with your internet package, offering convenience and potentially savings on installation costs.
It’s also worth noting that some ISPs provide cloud storage options, allowing you to back up important files securely. This is particularly useful for families or businesses that rely on data security. When researching ISPs, always check for these additional services, as they can add significant value to your fibre installation.
Understanding Installation Costs
When considering fibre installation in your home, it’s essential to understand the associated costs. In the Western Cape, particularly in Cape Town, these costs can vary significantly based on several factors. Firstly, the installation fee itself may differ between internet service providers (ISPs). For instance, some providers, like Telkom or Vodacom, might offer promotional deals that waive installation fees if you sign a contract for a specific duration. It’s advisable to inquire about any ongoing promotions when you choose your package.
Moreover, the type of installation can also impact costs. If your home requires extensive work, such as digging trenches for underground cables or additional routing through walls, this could increase the overall expense. Typically, a standard installation might range from R1,000 to R3,000, depending on the complexity of the setup. It’s wise to get a detailed quote from your provider after they assess your property, ensuring you know what to expect.
Lastly, keep in mind that some ISPs offer bundles that include installation as part of a package deal, which might save you money in the long run. Always review the full terms and conditions of any offer before committing.
Cost Item
Description
Estimated Cost (ZAR)
Notes
Installation Fee
Fee charged by the ISP for the installation of fibre lines
1500 – 3500
May vary based on provider and promotions.
Equipment Cost
Cost of the necessary equipment such as modem/router
800 – 2000
Some ISPs may provide the router for free.
Monthly Subscription
Recurring charge for the internet package based on speed
500 – 2000
Depends on the selected package.
Additional Services
Cost for extra services like smart home integration
Varies
Depends on service provider’s offerings.
Geolocation Considerations in the Western Cape
When installing fibre in the Western Cape, particularly in Cape Town, it’s essential to consider the geographic and environmental factors that may impact the installation process. Cape Town is known for its diverse landscape, from coastal areas to mountainous regions, which can affect how fibre cables are laid. For instance, if you reside in a coastal area, the installation team may need to take extra precautions against high winds and salt exposure, which could damage the cables over time.
Additionally, certain neighbourhoods may have unique construction regulations or homeowner association guidelines that dictate how installations should be carried out. It’s advisable to check with local authorities or your building management to ensure compliance. For example, some areas may require permits for digging trenches or installing external equipment, which could delay the installation process.
Moreover, the availability of fibre can vary significantly within different suburbs and districts. Areas that are further from the city centre might have limited access to fibre services due to infrastructure challenges. It’s crucial to use your ISP’s online tools to verify fibre availability and understand the specific conditions in your area before moving forward with the installation.
Lastly, be aware of seasonal weather patterns. The Western Cape experiences strong winds and heavy rains, particularly during certain months, which could disrupt the installation schedule. It’s wise to plan your installation during a time when weather conditions are more stable to avoid unnecessary delays.
TL;DR To install fibre in your home in Cape Town, understand the basics of fibre optics, determine your provider, check availability, sign up for a package, and schedule your installation. Prepare for the installation by ensuring access points are clear, and discuss specific requirements with your provider. The technician will install the fibre, test the connection, and guide you in setting up your router. Familiarise yourself with aftercare and support options, and consider local regulations and additional services from ISPs. Be aware of installation costs and any promotions available.
Frequently Asked Questions (FAQs) About Fibre Installation
1. What tools do I need to install fibre in my home?
To install fibre, you’ll typically need tools like a fibre optic cable, a cable cutter, a splicer, and possibly a connector kit. A drill may also be necessary for running cables through walls.
2. How can I tell if my home is ready for fibre installation?
You can check if your home is ready for fibre installation by looking for fibre optic cables installed in your area, or by contacting your internet service provider to see if they offer fibre in your location.
3. Can I install fibre myself, or do I need a professional?
While some parts of the fibre installation can be done yourself, it’s often best to hire a professional, especially for the splicing and connecting, to ensure everything is done safely and correctly.
4. What are the common problems during fibre installation?
Common problems can include difficulty accessing certain areas of your home, improper cabling that can interfere with the signal, and complications when splicing the cables. It’s important to follow instructions carefully to avoid these issues.
5. How long does it take to install fibre in a home?
The installation time can vary, but typically it takes a few hours to a full day depending on the complexity of your home layout and whether you’re doing it yourself or hiring a professional.
Welcome to FibreGeeks. This website uses cookies, which help to run the website in various ways, including providing essential services, advertising and analytics. By accepting or rejecting this notice, or continuing to use this website, you consent to us using essential cookies. You can find out more information about how we manage cookies in our Cookie Policy.
By clicking “ACCEPT ALL”, you consent to the use of ALL the cookies. However, you may visit "Cookie Settings" to provide a controlled consent.
This website uses cookies to improve your experience while you navigate through the website. Out of these, the cookies that are categorized as necessary are stored on your browser as they are essential for the working of basic functionalities of the website. We also use third-party cookies that help us analyze and understand how you use this website. These cookies will be stored in your browser only with your consent. You also have the option to opt-out of these cookies. But opting out of some of these cookies may affect your browsing experience.
Necessary cookies are absolutely essential for the website to function properly. These cookies ensure basic functionalities and security features of the website, anonymously.
Cookie
Duration
Description
cookielawinfo-checkbox-advertisement
1 year
Set by the GDPR Cookie Consent plugin, this cookie is used to record the user consent for the cookies in the "Advertisement" category .
cookielawinfo-checkbox-analytics
11 months
This cookie is set by GDPR Cookie Consent plugin. The cookie is used to store the user consent for the cookies in the category "Analytics".
cookielawinfo-checkbox-functional
11 months
The cookie is set by GDPR cookie consent to record the user consent for the cookies in the category "Functional".
cookielawinfo-checkbox-necessary
11 months
This cookie is set by GDPR Cookie Consent plugin. The cookies is used to store the user consent for the cookies in the category "Necessary".
cookielawinfo-checkbox-others
11 months
This cookie is set by GDPR Cookie Consent plugin. The cookie is used to store the user consent for the cookies in the category "Other.
cookielawinfo-checkbox-performance
11 months
This cookie is set by GDPR Cookie Consent plugin. The cookie is used to store the user consent for the cookies in the category "Performance".
CookieLawInfoConsent
1 year
Records the default button state of the corresponding category & the status of CCPA. It works only in coordination with the primary cookie.
viewed_cookie_policy
11 months
The cookie is set by the GDPR Cookie Consent plugin and is used to store whether or not user has consented to the use of cookies. It does not store any personal data.
Functional cookies help to perform certain functionalities like sharing the content of the website on social media platforms, collect feedbacks, and other third-party features.
Performance cookies are used to understand and analyze the key performance indexes of the website which helps in delivering a better user experience for the visitors.
Analytical cookies are used to understand how visitors interact with the website. These cookies help provide information on metrics the number of visitors, bounce rate, traffic source, etc.
Advertisement cookies are used to provide visitors with relevant ads and marketing campaigns. These cookies track visitors across websites and collect information to provide customized ads.